Operating System : Microsoft Windows ( Bios Setup, Startup Computer, Format Computer )
Operating System
Definition
Operating system is a program that control both hardware and software. It is low-level software that supports a computer's basic functions, such as scheduling tasks and controlling peripherals.
All computer and devices that perform just like a computer such as smartphone, tablets, smartwatch and etc.
Example Of Operating system
Examples include versions of Microsoft Windows (like Windows 10, Windows 8, Windows 7, Windows Vista, and Windows XP), Apple's macOS (formerly OS X), iOS, Chrome OS, BlackBerry Tablet OS, and flavors of the open source operating system Linux.
Microsoft Windows
Microsoft Windows is a group of several graphicaloperating system families, all of which are developed, marketed, and sold by Microsoft. Each family caters to a certain sector of the computing industry. Active Windows families include Windows NT and Windows Embedded; these may encompass subfamilies, e.g. Windows Embedded Compact (Windows CE) or Windows Server. Defunct Windows families include Windows 9x, Windows Mobile and Windows Phone.
Bios Setup
BIOS (basic input/output system) is the program a personal computer's microprocessor uses to get the computer system started after you turn it on. It also manages data flow between the computer's operating system and attached devices such as the hard disk, video adapter, keyboard, mouse and printer.
Finding Bios Setup
1. Turn off the computer and wait five seconds.
2. Turn on the computer and immediately press the F10 key repeatedly until a BIOS Setup screen opens.If nothing happens, press the F1 key repeatedly.
3.In the BIOS Setup utility, do one of the following:
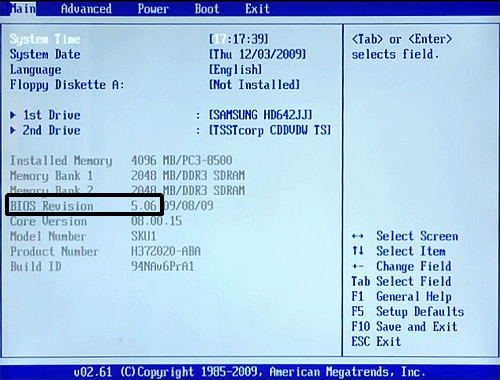
On the Main tab, find the BIOS version.
Figure 1: Finding the version for BIOS version 6 or less
On the File tab, use the down arrow to select System Information, and then press Enter.
Figure 2 : Finding the BIOS version
On the System Information screen, find the BIOS version.
Figure 3 : Finding the version for BIOS version 7 or greater
Startup Computer
Managing startup apps in windows 10
Step 1:Launch thetask manager. You can find thetask managerby clicking on theWindowsbutton and looking for it in the list, or searching for it in the nearby search bar.
Step 2: The task manager will only show the current programs you have open. Get it to reveal more information by selecting at More details the bottom of the window. This opens a larger window with a much longer list of apps and various tabs. Don’t get overwhelmed! Look at the tab options and go to the one that says “Start up.”
Step 3: The Start up tab shows you all the apps that are enabled to auto-start when you login. You’ll notice that all active apps say “Enabled” in the status section. That’s the part you want to change. Look through the list and find the apps that you don’t need to automatically launch — this varies, but consider your tasks and what’s essential. You probably want OneDrive to launch at work, your Nvidia graphics card to launch on a gaming rig, and so on. When you find an app you don’t need, right-click (or do a long tap with your finger, etc.) to bring up a menu where the your first option is to Disable the app. There’s also a Disable button at the bottom of the window if you don’t want to right-click.
Step 4: In the task manager, you’ll see that the last column is called “Start up impact” which is designed to show just how much time it may be taking up. If it says “None” then you probably don’t need to worry about disabling it. If it says “Not measured,” then it’s probably a new app (or you have a new Windows 10 OS), because Windows hasn’t been able to measure its impact yet. Over time, Startup impact can provide useful information on what apps are best to disable. Look for apps that have a “High” impact, and odd-named apps that don’t have anything listed under Publisher. These are prime targets.
Step 5: If you aren’t sure what an app does, it’s a smart idea to leave it. But if you’re desperate to improve login speeds and you end up disabling a few apps that you don’t really recognize, your next step should be to shut down your computer and then restart it. Login and complete a few basic tasks, stream some video, and generally try things out. This will help both determine if the startup speed has improved, and see if you accidentally disabled an app that it looks like you need. Even if the app is disabled, it will still stay listed in the task manager so that you can enable it again if necessary.
Installing windows
The classic method of performing a clean install is still our go-to option with Windows 10. You just need to download and create installation media, either on a DVD or a flash drive, and install it from there.
Download the Windows 10 media creation tool from Microsoft. This tool will download the correct Windows 10 installation files for your system, and help you create an installation DVD or flash drive. Start it up and select the “Create installation media for another PC” option to create installation media.
Be sure to select the correct type of installation media for the copy of Windows 10 that’s licensed for your PC — Windows 10 Home or Professional. (If “Windows 10” is the only option, you can safely use that and it will detect what version you want.) You should also choose your language and select whether you want the 32-bit or 64-bit version of Windows here. Most people will want the 64-bit version, but you can create installation media that includes both, and the installer will automatically select the most appropriate one when you use it to install Windows on a computer.
Install Windows 10 from the installation media like you would any other operating system. Restart your computer with the USB drive or DVD inserted, and boot from that device. This may require you change a setting in the BIOS, access a boot menu, or use the “Use a device” option in the advanced startup options on a modern Windows 8 or 10 device that includes UEFI firmware instead of the traditional BIOS. Select “Install Now” once the Windows installer starts.
Next, you’ll see the activation screen. What you do here depends on your situation:
If you’ve never installed and activated Windows 10 on this computer before, you’ll see the activation screen. Enter your Windows 10 key here. If you don’t have one, but you have a valid 7, 8, or 8.1 key, enter it here instead.
If you’ve ever installed and activated Windows 10 on this computer before, click “I don’t have a product key”. Windows will automatically activate once it’s installed.
The second situation works because of how Windows 10 activates PCs. When you install and activate Windows 10 on a system for the first time, the installer confirms that you have a “genuine Windows” system installed and registers your hardware with Microsoft’s servers. After that, you shouldn’t have to enter that key again on the same PC–Microsoft will recognize your hardware the next time you install Windows 10 on that machine, confirm it’s registered, and automatically activate itself.
Go through the setup process normally until you see the “Which type of installation do you want?” screen. Select the “Custom” option to ensure you’re performing a clean install and not an upgrade install.
Partition your system drive however you like. If you just have a single Windows partition, you can tell the installer to overwrite it. If you have many partitions, you could delete them all and tell Windows 10 to install itself in the unallocated space.
After you log into your new, cleanly installed Windows 10 system, it should automatically activate itself after you connect to the Internet.
To ensure it activated correctly, open the Start menu and click on Settings. click the Update & Security button, and go to the “Activation” tab.
Verify that you see “Windows is activated” here. Also, note the edition of Windows 10 you have installed — either Windows 10 Home or Windows 10 Pro. Most people will receive the Home edition as part of the free upgrade from 7 or 8, but you’ll get Windows 10 Pro if you previously had a Professional edition of Windows 7 or 8 installed.
When we reinstalled Windows 10 Pro on our computer, it activated immediately. But, if Microsoft’s activation servers are overloaded, so it may take some time before your system activates. If it’s not activated, you may see information here that can help you activate.
Some people report having to reboot several times, while others have just waited. The following command can force an activation to occur if it’s not happening automatically after going through the steps above. First, open an Administrator Command Prompt by right-clicking the Start button or pressing Windows Key + X and selecting Command Prompt (Admin). Type the following command and press Enter:
slmgr.vbs /ato
Many people report having to run this command several times. if you see an error message, try rebooting and running it again, wait and run it again, or just wait and let Windows activate automatically. Microsoft’s servers may be overloaded at the moment you’re trying to activate.
Format Computer
Navigate to Settings. You can get there by clicking the gear icon on the Start menu.
Select "Update & security"
Click Recovery in the left pane.
Windows presents you with three major options: Reset this PC, Go back to an earlier build and Advanced startup. Reset this PC is the best option for starting fresh. Advanced startup lets you boot off a recovery USB drive or disc and "Go to an earlier build" is made for Windows Insiders who want to roll back to a previous version of the OS.
Click Get started under Reset this PC.
Click either "Keep my files" or "Remove everything," depending on whether you want to keep your data files intact. Either way, all of your settings will return to their defaults and apps will be uninstalled.
Select "Just remove my files" or "Remove files and clean the drive" if you chose to "remove everything" in the prior step. Cleaning the drive takes a lot longer but will make sure that, if you are giving the computer away, the next person will have a hard time recovering your erased files. If you are keeping the computer, choose "Just remove my files."
Click Next if Windows warns you that you won't be able to roll back to a prior version of the OS.
Click Reset when prompted.
Windows will then restart and take several minutes to reset itself.

 On the System Information screen, find the BIOS version.
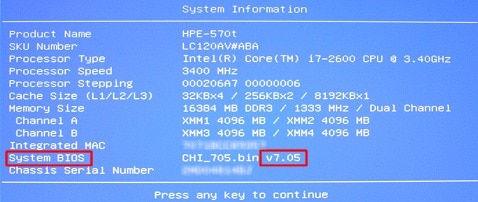


 Be sure to select the correct type of installation media for the copy of Windows 10 that’s licensed for your PC — Windows 10 Home or Professional. (If “Windows 10” is the only option, you can safely use that and it will detect what version you want.) You should also choose your language and select whether you want the 32-bit or 64-bit version of Windows here. Most people will want the 64-bit version, but you can create installation media that includes both, and the installer will automatically select the most appropriate one when you use it to install Windows on a computer.

 Go through the setup process normally until you see the “Which type of installation do you want?” screen. Select the “Custom” option to ensure you’re performing a clean install and not an upgrade install.
Partition your system drive however you like. If you just have a single Windows partition, you can tell the installer to overwrite it. If you have many partitions, you could delete them all and tell Windows 10 to install itself in the unallocated space.
Go through the setup process normally until you see the “Which type of installation do you want?” screen. Select the “Custom” option to ensure you’re performing a clean install and not an upgrade install.
Partition your system drive however you like. If you just have a single Windows partition, you can tell the installer to overwrite it. If you have many partitions, you could delete them all and tell Windows 10 to install itself in the unallocated space.
 After you log into your new, cleanly installed Windows 10 system, it should automatically activate itself after you connect to the Internet.
To ensure it activated correctly, open the Start menu and click on Settings. click the Update & Security button, and go to the “Activation” tab.
After you log into your new, cleanly installed Windows 10 system, it should automatically activate itself after you connect to the Internet.
To ensure it activated correctly, open the Start menu and click on Settings. click the Update & Security button, and go to the “Activation” tab.
 Verify that you see “Windows is activated” here. Also, note the edition of Windows 10 you have installed — either Windows 10 Home or Windows 10 Pro. Most people will receive the Home edition as part of the free upgrade from 7 or 8, but you’ll get Windows 10 Pro if you previously had a Professional edition of Windows 7 or 8 installed.
When we reinstalled Windows 10 Pro on our computer, it activated immediately. But, if Microsoft’s activation servers are overloaded, so it may take some time before your system activates. If it’s not activated, you may see information here that can help you activate.
Some people report having to reboot several times, while others have just waited. The following command can force an activation to occur if it’s not happening automatically after going through the steps above. First, open an Administrator Command Prompt by right-clicking the Start button or pressing Windows Key + X and selecting Command Prompt (Admin). Type the following command and press Enter:
Verify that you see “Windows is activated” here. Also, note the edition of Windows 10 you have installed — either Windows 10 Home or Windows 10 Pro. Most people will receive the Home edition as part of the free upgrade from 7 or 8, but you’ll get Windows 10 Pro if you previously had a Professional edition of Windows 7 or 8 installed.
When we reinstalled Windows 10 Pro on our computer, it activated immediately. But, if Microsoft’s activation servers are overloaded, so it may take some time before your system activates. If it’s not activated, you may see information here that can help you activate.
Some people report having to reboot several times, while others have just waited. The following command can force an activation to occur if it’s not happening automatically after going through the steps above. First, open an Administrator Command Prompt by right-clicking the Start button or pressing Windows Key + X and selecting Command Prompt (Admin). Type the following command and press Enter:
 Format Computer

 Windows presents you with three major options: Reset this PC, Go back to an earlier build and Advanced startup. Reset this PC is the best option for starting fresh. Advanced startup lets you boot off a recovery USB drive or disc and "Go to an earlier build" is made for Windows Insiders who want to roll back to a previous version of the OS.


 Windows will then restart and take several minutes to reset itself.


Comments
Post a Comment